
Youth basketball drills
Basketball drills for middle school: practice with decisions
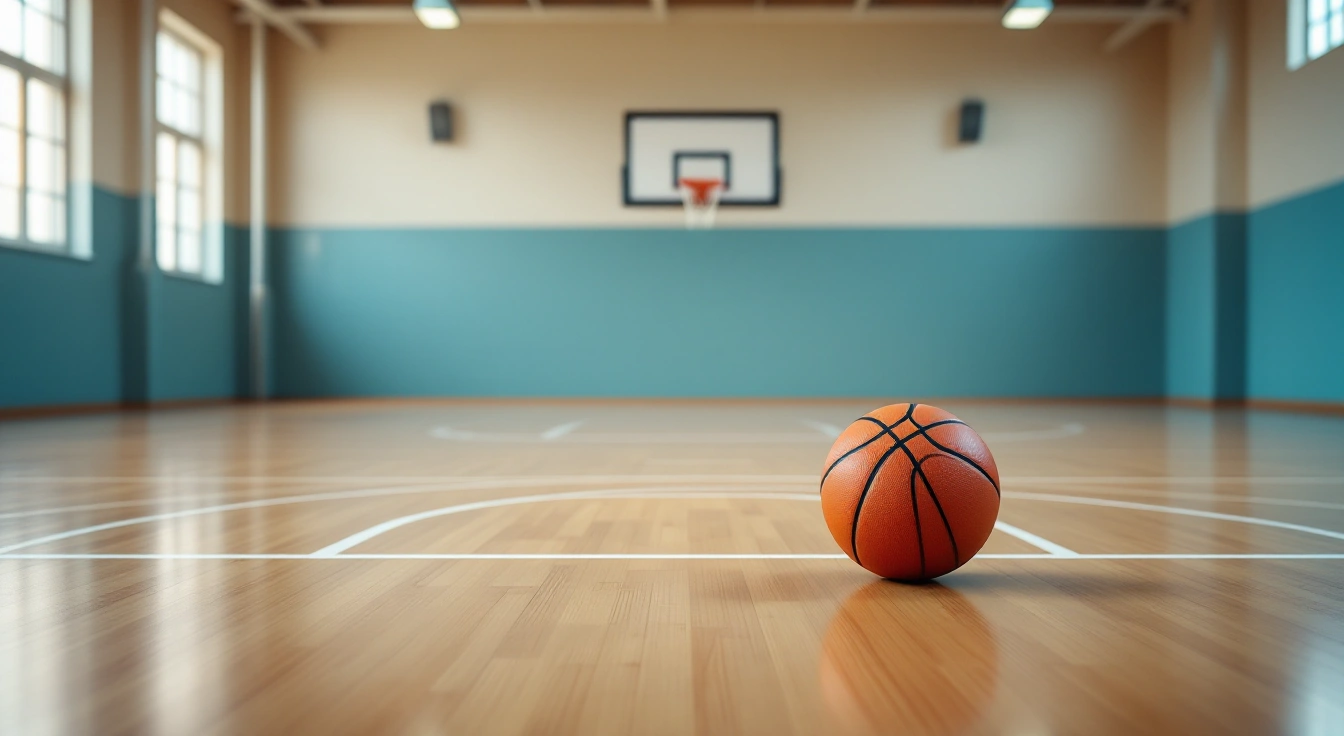
Basketball drills for middle school should connect a skill to the next decision under suitable pressure. Some players may still need a calm catch while others can read a defender. These original tasks let the adult keep one shared goal without making age or size a fixed playing position.
Begin with a known ball-handling route, then add a clear outlet and slow pressure. Use a pass or shot choice, permitted help and a rebound before a larger game. All counts and times below are our teaching examples. An adult must watch the task, check the program’s rules and choose a version the group can do. No drill promises game results or needs a child’s record.
The NBA/USA Basketball ages 12–14 chart is distinct from the younger-age guidance. Check the applicable category and local defensive restrictions before making pressure live.
On this page
Group and equipment checks
Count the available baskets. Keep waiting routes clear. Check which screens the league permits. Check its rules on pressing and help too.
Middle-school grades can cover different age and experience groups. The NBA/USA Basketball source age bands are labeled guidance, not a substitute for local adoption. Use short fixed rotations so the first ball handler and the defender both change. Keep the early pressure passive and free of contact.
Group setup and readiness
- Goal: Find which part of a combined task needs a simpler version.
- Readiness: Can join a supervised short lane exercise.
- Players: Pairs with an adult observing.
- Space: Travel lane ending at a clear receiving window.
- Equipment: One ball per pair and destination spot.
- Editable example time: 3 minutes, exchange jobs after one attempt.
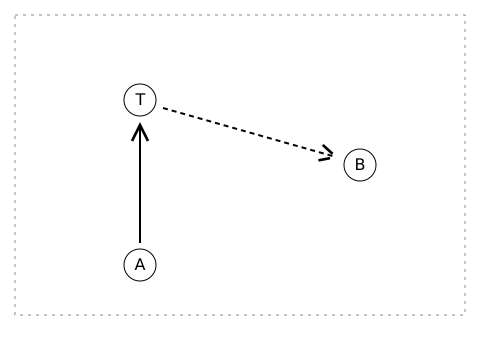
A dribbles to T, gathers and passes to B outside the lane along the dashed line. End at B’s controlled catch to see which part of the sequence needs the next teaching turn.
Solid arrows show player movement; dashed arrows show the ball. The dotted edge marks an illustrative work area, not regulation boundaries.
Step 1: A walks with a dribble to T, gathers under control and sees B outside the lane. B shows a target for the pass. End the turn on B’s catch so the adult can identify whether travel or stop, or receiving caused the first problem.
Step 2: Offer the same sequence with a still start if needed. A player who is new to basketball need not face pressure to stay with the group. Use this check to choose the next task rather than score a public trial.
Coach cue: Keep the next choice after the stop.
Easier version: Begin with the ball held at T.
Harder version: Use a moving receiver at a known nearby spot.
Observe: The adult can name a concrete next task from the attempted action.
Pressure ball handling
- Goal: Keep a visible escape and an outlet under controlled pressure.
- Readiness: Can travel and stop with the ball.
- Players: Dribbler, shadow defender and outlet.
- Space: Wide short area with two clear exits.
- Equipment: One ball and flat exit markers.
- Editable example time: 4 minutes, rotate all three jobs.
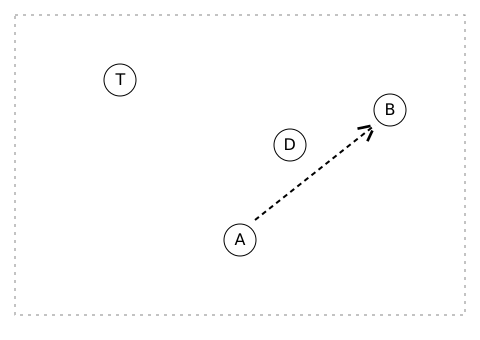
D shades one side of A’s route toward T without contact. B stays visible outside as the passing outlet. A uses the open side or the dashed outlet pass, then stops before rotating.
Solid arrows show player movement; dashed arrows show the ball. The dotted edge marks an illustrative work area, not regulation boundaries.
Step 1: D shades one side at walking pace with hands back. A keeps the ball controlled and moves toward the other clear exit. B stays visible outside the route. The attempt ends when A passes to ready hands or stops in balance.
Step 2: Let D choose the shaded side only after the first version is understood. Do not make the defender’s job simply to grab at the ball. Add any live stealing only if the local rules and group readiness permit it.
Coach cue: Escape toward a useful next pass.
Easier version: Remove D and point to a known exit.
Harder version: Let B adjust between two nearby outlet angles.
Observe: A keeps sight of an outlet rather than turning away until the route closes.
Passing and cutting
- Goal: Read whether a cut remains open after the pass.
- Readiness: Can complete a controlled triangle exchange.
- Players: Three attackers and one passive adult defender.
- Space: Broad outside spots with a clear middle exit.
- Equipment: One ball and optional floor spots.
- Editable example time: 5 minutes, rotate the first passer.
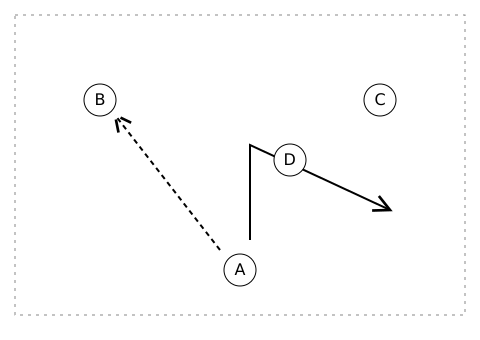
A passes to B and offers the solid cut through the middle. Adult D can stand in that cut window; C stays outside as the alternate pass. A clears even when B cannot return the ball.
Solid arrows show player movement; dashed arrows show the ball. The dotted edge marks an illustrative work area, not regulation boundaries.
Step 1: A sends to B and offers a cut through the middle. C stays outside as another target. D can stand in the cut window without contact. B decides whether a catchable return exists rather than release because A has begun moving.
Step 2: When covered, A clears and C offers the next outside pass. Freeze once to show how the outlet was created. Later let D close the outside route instead, keeping both decisions slow enough to see.
Coach cue: The cut offers a choice; the pass still needs a window.
Easier version: Run the exit with no return pass.
Harder version: Allow D one slow step after B catches.
Observe: The ball handler chooses between a real cut and a real outlet.
Shoot-or-pass decisions
- Goal: Choose a controlled attempt or a visible teammate after the catch.
- Readiness: Can receive in balance and use the chosen close shot.
- Players: Receiver, feeder, outlet and passive defender.
- Space: One basket area with a separate outlet lane.
- Equipment: One ball and suitable basket.
- Editable example time: 5 minutes, end after one choice.
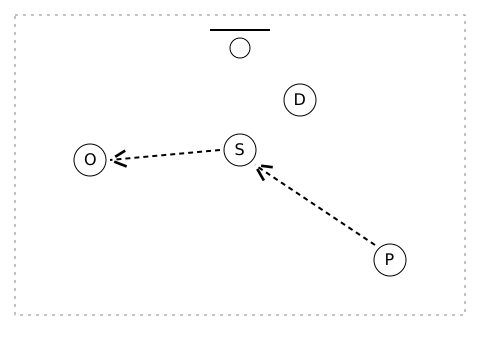
P feeds S, D either stays back or approaches with a gap, and O is the outside outlet. S reads the shot view before releasing. The dashed S-to-O route shows the pass when the shot is covered.
Solid arrows show player movement; dashed arrows show the ball. The dotted edge marks an illustrative work area, not regulation boundaries.
Step 1: The feeder gives S a gentle catch while D either leaves the shot view open or approaches with a gap. The outlet stays in a clear different angle. S looks before starting the release and chooses the open shot or pass.
Step 2: End at the attempt or outlet catch and rotate the jobs. A made forced shot is not the only result to praise. If the catch itself is rushed, remove D and restore control before the decision returns.
Coach cue: Read before the lift.
Easier version: Show D’s chosen response before the pass.
Harder version: Allow the defender to choose slowly as the ball travels.
Observe: The decision follows the visible gap without a collision or a blind throw.
Help and recovery
- Goal: See the player left behind when help moves.
- Readiness: Competition permits the chosen help and the group can stop on cue.
- Players: Ball handler, on-ball defender, receiver and helper.
- Space: Open half court with distinct ball and receiver windows.
- Equipment: One ball.
- Editable example time: 5 minutes, walk the early turns.
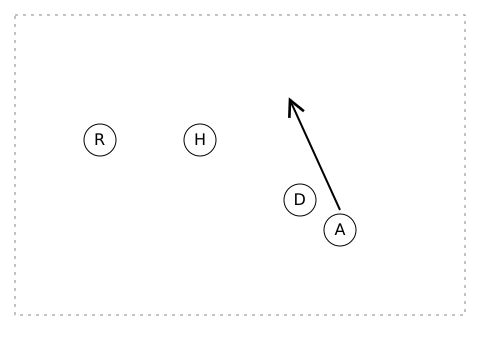
A begins the drive along the solid arrow with D on the ball. H is the helper and R the assigned outside receiver. Freeze before contact, then pass to R and let H recover by a clear route.
Solid arrows show player movement; dashed arrows show the ball. The dotted edge marks an illustrative work area, not regulation boundaries.
Step 1: Place the helper where both the ball and assigned receiver are visible. Walk a drive toward the middle, show the permitted help position and freeze before contact. The helper names who is still open after that movement.
Step 2: Pass toward the receiver and let the helper recover by a clear route. If local rules restrict the help, retain the viewing task without the second defender crowding the ball. Exchange all four jobs before increasing uncertainty.
Coach cue: Know the route back before leaving.
Easier version: Keep the ball still and point to both responsibilities.
Harder version: Let the passer choose between holding and the known outlet.
Observe: The helper returns on the pass rather than remain beside the ball.
Rebounding and the first outlet
- Goal: Finish a defensive possession with a controlled pass.
- Readiness: Can catch a gentle toss and turn legally.
- Players: Rebounder, shadow opponent and outside outlet.
- Space: Clear landing area plus separate receiving angle.
- Equipment: One ball with an adult controlling the toss.
- Editable example time: 4 minutes, rotate after each outlet.
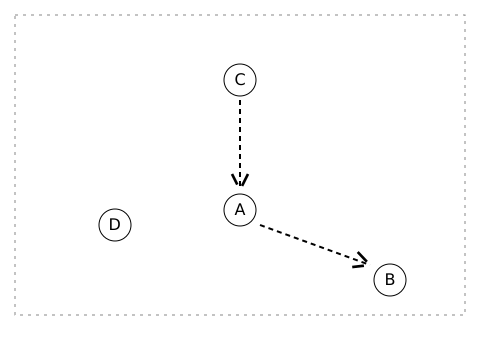
C is the adult tosser, A the rebounder and B the outlet. The dashed routes run C to A, then A to B after a secure catch. Add shadow D only after the uncontested catch is clear.
Solid arrows show player movement; dashed arrows show the ball. The dotted edge marks an illustrative work area, not regulation boundaries.
Step 1: The adult holds the ball while the rebounder locates the shadow opponent and the clear catch area. Give a gentle toss with no contact contest in the first version. The outlet shows hands outside the landing route.
Step 2: The rebounder secures the ball, finds the outlet and passes only through a clear line. End on the catch. Later vary the toss direction, leaving the role rotation and contact limit the same.
Coach cue: Possession is not finished at the first touch.
Easier version: Use an uncontested catch from a still spot.
Harder version: Let the outlet choose between two open sides.
Observe: The ball remains controlled from rebound through the receiving catch.
Small-sided play with one constraint
- Goal: Use the day’s decision in a live but readable game.
- Readiness: Group understands its local rules and the chosen skill task.
- Players: Three attackers and three defenders in short rotations.
- Space: One marked half-court area.
- Equipment: One ball and an adult-managed restart.
- Editable example time: 6 minutes, short fixed turns.
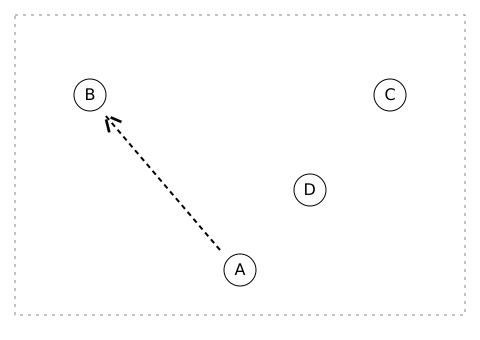
A begins with outside outlets B and C while D provides controlled pressure. The dashed pass shows one restart. Keep a visible outlet after the drive, ending or freezing the turn when that decision appears.
Solid arrows show player movement; dashed arrows show the ball. The dotted edge marks an illustrative work area, not regulation boundaries.
Step 1: Choose one original practice constraint, such as keeping a visible outside outlet after a drive. Explain it before play and let normal permitted scoring give the attack a purpose. This is a modified teaching game, not official FIBA 3x3 competition.
Step 2: Pause after a possession that shows the outlet decision. Ask where the next pass was open, take one answer and restart. Rotate resting players at the agreed short interval regardless of who just scored.
Coach cue: One shared decision is enough for this game.
Easier version: Use two attackers and one shadow defender.
Harder version: Let the defenders choose their permitted response while keeping the same outlet task.
Observe: Players can identify the next window without an adult dictating every pass.
Recover, secure and restart
- Goal: Connect a defensive recovery to the next attacking start.
- Readiness: Understands the separate recovery and outlet tasks.
- Players: Three working with an adult.
- Space: Broad short recovery lane and outside target.
- Equipment: One ball and a flat recovery marker.
- Editable example time: 4 minutes, return calmly between turns.
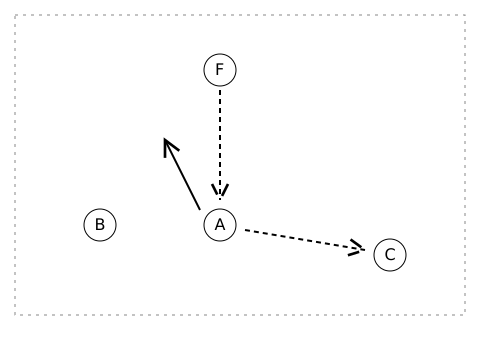
A recovers beside walking ball handler B, then receives adult F’s simulated rebound toss. C is the outside outlet. The dashed sequence runs F to A to C; the teaching toss is separate from a live possession.
Solid arrows show player movement; dashed arrows show the ball. The dotted edge marks an illustrative work area, not regulation boundaries.
Step 1: A begins one step away from the chosen defensive route and recovers without contact as B walks with the ball. The adult stops the action and gives A a gentle simulated rebound toss. C remains outside as the outlet.
Step 2: A secures and passes to C, then all three walk to the next starting jobs. The toss makes this an authored teaching sequence, not a stolen possession. Later remove the toss only in a permitted live game with clear supervision.
Coach cue: A recovery should lead to a controlled new possession.
Easier version: Separate the recovery walk and catch into two turns.
Harder version: Vary the outlet side while keeping the recovery route known.
Observe: The group resets without a rushed chase after the outlet.
Put these activities into a practice
For a group with mixed readiness, keep the same question and change the pressure. One attacker can read a still shadow while another faces a slow choice. Both need a clear outlet.
Here is an editable 32-minute block. Start with 3 minutes to check readiness. Use 4 for pressure and outlet, then 5 for passing and cutting. Take 2 for water, then use 5 for shot choices.
Allow 3 for explaining and resetting stations, 6 for a small game and 4 for review.
That total includes the transitions and is not an official training prescription. A longer session needs its own participation and rest planning. Use the game to identify a next task rather than claim the drill produced a measured long-term gain.
Keep feedback about the actual space and catch, then the decision; no child names or individual records are needed.
FAQ
Does middle school mean the advanced version is required?
No. A new player may need a still catch or a known route. Offer that version while retaining the shared cue, then add pressure when the action is controlled and the program permits it. Grade level is not proof of readiness for contact, speed or a more crowded game.
How many constraints should a small game use?
Begin with one that matches the teaching goal. Several new scoring and passing rules can hide the actual decision. State which parts are modified practice choices and which are adopted game rules. Add another condition only if it solves a specific problem the group has shown.
Should the tallest players always rebound?
Rotate the rebound and outlet jobs during learning. The task includes seeing an opponent, securing possession and finding a pass, which every player can practice at a suitable level. Height alone does not decide who should learn it. Avoid permanent practice jobs that leave some players without a useful decision.
What if a drill produces repeated contact?
Stop the turn and inspect the route and pressure level. Return to a walking or no-contact version, or remove a defender. Do not describe a collision as the intended learning result. The adopted rules and program supervision remain the boundaries for any later contest, regardless of the drill’s name.
Choose the next coaching task
Youth Basketball Tips · https://youth-basketball-tips.com/youth-basketball-drills/basketball-drills-for-middle-school/