
Basketball skills
How to shoot a basketball: a youth coach’s teaching guide
Teach how to shoot a basketball from a spot where the player can reach the target with a calm motion. Balance and a repeatable release are more useful first tasks than distance. This adult coaching guide gives cues to try, then shows what to observe before making the task harder.
Begin near a suitable basket. Help the player find a comfortable base, place the shooting hand under the ball and keep the other hand beside it. Extend toward the target and let the shooting wrist finish freely. If the motion turns into a heave, reduce range or use suitable equipment. These are teaching cues, not a single body position that every player must copy.
USA Basketball’s foundational shooting lesson starts with shooting mechanics. Use a close spot where the player can reach the target with a controlled motion.
On this page
Balance and a comfortable starting position
Ask for a stance that feels steady without locking the knees. Let the player hold the ball and look at the target before shooting. A coach can watch whether the feet move to rescue the release. If they do, start closer rather than add a demand to jump higher.
The USA Basketball foundational shooting resources organize instruction around balance and the release. That is a framework, not a reason to force identical foot angles on every child. Use a clear demonstration and one short cue. Give the player time to try it before adding a second correction.
Ball placement and guide hand
The shooting hand supplies the upward action while the other hand steadies the ball at its side. Check whether the guide hand pushes across the ball at release. A simple close attempt can make that easier to see than a long shot.
Let the player find a grip they can control. If they must squeeze the ball against the chest or swing it from the side to reach, check the ball and target fit. Don't solve an equipment problem by demanding an adult release from an unsuitable range.
Extend and follow through
Show the movement slowly: begin in balance, raise the ball toward the target and finish with the shooting arm extended. Let the wrist finish without a forced snap. Watch where the player lands and whether they can remain still after release.
Give the observer a single task, such as watching the guide hand. Avoid evaluating several joint positions after every attempt. A useful comment describes what happened: “the other hand stayed beside the ball.” It does not promise that the next shot will go in.
Adjust range and equipment
Move back only after the player can repeat the task from the close spot. A made shot alone is not enough evidence. Look for a calm starting position and a landing that stays inside the clear area. Keep another player's rebound route away from that landing area.
The local program supplies equipment rules. Youth recommendations may use a lower basket or smaller ball than adult competition. If the venue has a fixed basket, use a target pass or a closer activity that serves the lesson. Never describe a particular setup as suitable for every child of one age.
Troubleshoot common errors
| What the adult sees | Try next | Watch for |
|---|---|---|
| Ball flies sideways | Check the guide hand at a close spot | Side hand stays quiet |
| Player leans far forward | Reduce range and pause before the shot | Balanced start and landing |
| Release starts below the waist | Use a comfortable close target | No large swing to gain force |
| Feet rush after a catch | Rehearse catch and stop without shooting | Control before the attempt |
Scroll for more →
Treat the table as a list of teaching trials. It does not diagnose a player's body or prove the cause of a miss. If a cue makes the movement less comfortable, stop forcing it. A coach can simplify the task and consult the program's teaching policy.
A first practice progression
This original example uses a shooter, a passer and a waiting spot outside the landing lane. The shooter makes a close attempt, clears the space and receives the next pass only after the ball is under control. Exchange jobs after a short turn, with no elimination for misses.
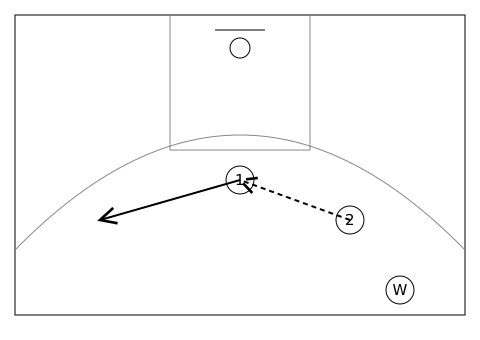
Add the catch only when the still attempt is calm. Next let the passer approach from a different angle. Keep the distance unchanged while that new part is learned. Later, a passive defender can make the player choose whether to shoot or pass, but only in a clear, supervised space.
FAQ
Should every shot use a jump?
No. A close still attempt can teach the release before a jump is useful. Choose the version that fits the player and program. Don't treat a lack of lift as a reason to add extra repetitions or strength work. Observe the starting balance and clear landing area first.
Should the coach count only made shots?
No. A made shot can hide a rushed catch or an off-balance landing. Choose one visible task and describe it after a short set. Keep observations at group level and do not submit children's records to this site. A repeatable motion matters to the teaching decision even after a miss.
Choose the next coaching task
Youth Basketball Tips · https://youth-basketball-tips.com/how-to-shoot-a-basketball.html