
Youth basketball drills
Basketball drills for 10 year olds: skills and small-sided games
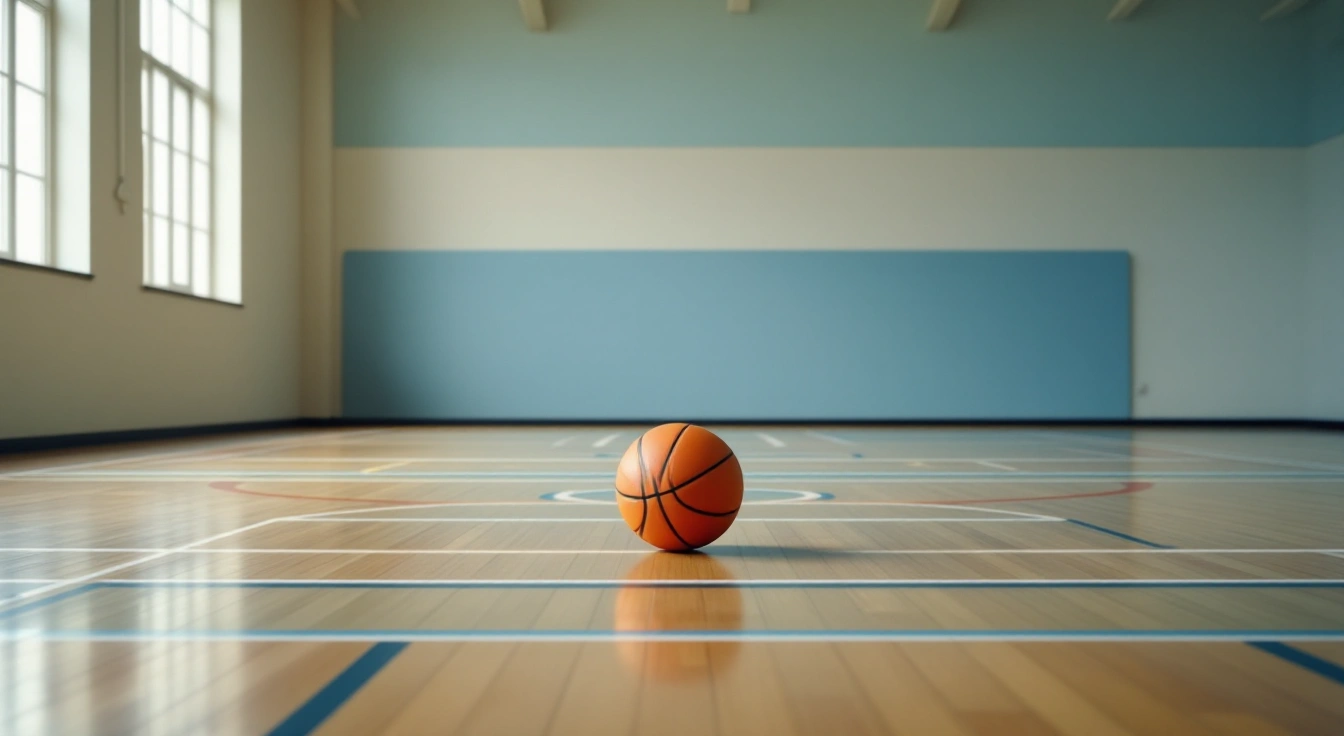
Basketball drills for 10 year olds can connect a controlled skill to one visible decision. Begin with the group’s actual readiness, not a demand for a complex play. These original tasks use short routes and clear rotations so the adult can watch the ball and receiving space.
Use a moving dribble, a pass-and-move task and a close finish before a small-sided game. Add a defender only within the local rules and after the first route is understood. The NBA/USA Basketball ages 9-to-11 chart gives named equipment and defensive guidance, not an individual skill assessment. Every drill duration and station arrangement below is an editable authored example.
The NBA/USA Basketball ages 9–11 chart recommends player-to-player set defense. Keep the small-sided decision game within that framework when your program follows it.
On this page
- Group and equipment checks
- Readiness and session setup
- Moving dribble and decision drill
- Pass-and-move drill
- Close-range finishing drill
- Small-sided game
- One-basket station rotation
- Receive, turn and find a new window
- Contain and offer an outlet
- Put these activities into a practice
- FAQ
- Choose the next coaching task
Group and equipment checks
Confirm the program’s rules, including player-to-player defense and limits on pressure. Keep baskets, spare balls and station paths clear. Assign an adult to any separate area that needs supervision. A player new to the activity may use a still or passive-defense version without leaving the group. Numbers in diagrams are positions only, never player records.
Readiness and session setup
- Goal: Check a stop and a receiving window before the main task.
- Readiness: Can follow the shared stop cue.
- Players: Pairs in separate lanes.
- Space: Short travel lane with a still receiving spot.
- Equipment: One ball per pair and flat spots.
- Editable example time: 3 minutes, switch after each turn.
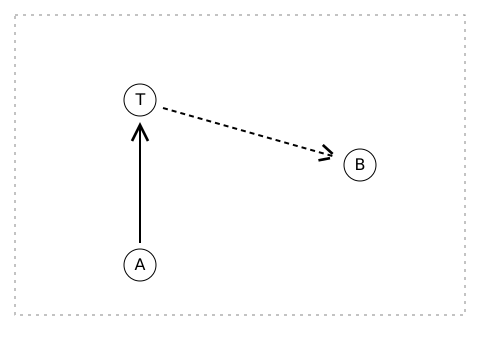
A dribbles to T, stops and passes along the dashed route to B outside the travel lane. B shows hands before the pass. The catch ends the check and the pair exchanges jobs.
Solid arrows show player movement; dashed arrows show the ball. The dotted edge marks an illustrative work area, not regulation boundaries.
Step 1: A walks with a controlled dribble to T, stops and looks toward B outside the lane. B shows hands before A passes. End on the catch and exchange jobs so the adult sees both the moving and receiving tasks.
Step 2: If either part is new, remove the travel and use a still catch. Keep the same target and pause. The check chooses a starting version; it is not a scored trial or a reason to rank the children.
Coach cue: Stop with a useful pass still available.
Easier version: Walk without a ball, then receive at the spot.
Harder version: Use the other hand on the same familiar route.
Observe: The stop does not leave A facing away from every receiver.
Moving dribble and decision drill
- Goal: Choose an exit after seeing a clear adult cue.
- Readiness: Can walk a route while keeping the ball close.
- Players: One mover with an adult cue giver.
- Space: Two wide exits beyond a short straight start.
- Equipment: One ball and visible flat exit markers.
- Editable example time: 4 minutes, alternate first hand.
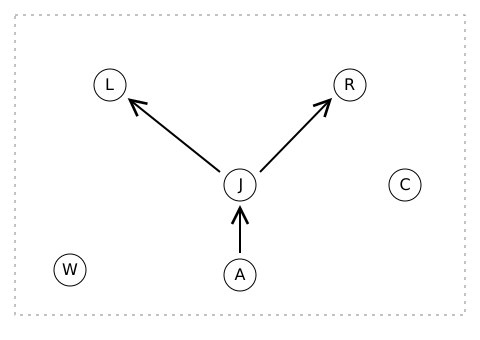
A follows the lane toward junction J. The adult C points to exit L or R before A reaches J. The two solid branches are alternatives, not simultaneous routes; W waits outside both.
Solid arrows show player movement; dashed arrows show the ball. The dotted edge marks an illustrative work area, not regulation boundaries.
Step 1: A follows the lane toward junction J. Before the turn, the adult points toward one exit. A looks, keeps the dribble controlled and uses that route without cutting through the other lane. Give the cue early in the first round.
Step 2: Pause at the end and walk back outside the work area. Later make the cue less predictable while keeping the same route and pace. A late signal that forces a collision is a setup error, not a useful reaction test.
Coach cue: Read early enough to stay in control.
Easier version: Name the exit before A begins.
Harder version: Add a slow shadow defender who closes the other exit.
Observe: A sees the cue without a chase or an unplanned cross-lane turn.
Pass-and-move drill
- Goal: Offer the next window after releasing the ball.
- Readiness: Can pass and catch at the chosen triangle distance.
- Players: Three with no defense first.
- Space: Broad triangle with a clear center.
- Equipment: One ball and three outside markers.
- Editable example time: 4 minutes, change first passer.
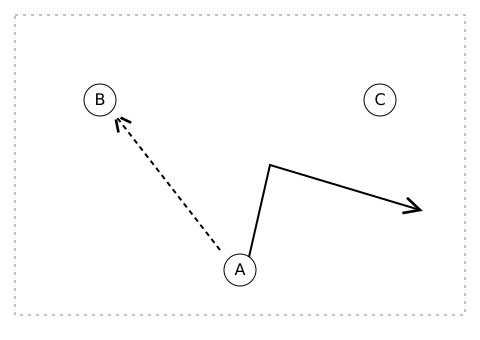
A passes to B on the dashed line, cuts through the clear middle and exits outside along the solid route. C waits until A clears before filling the starting space. B keeps the ball until a receiver is visible.
Solid arrows show player movement; dashed arrows show the ball. The dotted edge marks an illustrative work area, not regulation boundaries.
Step 1: A sends to B, moves through a clear middle and leaves by the empty outside side. C waits until A clears and then fills the space left behind. B sees the next receiver before the next pass.
Step 2: Add a passive adult in the cutting lane. B can use C instead of returning to A. A still clears the lane, so the next pass has room. Do not reward a forced return merely because the cutter moved.
Coach cue: A pass should leave another clear option.
Easier version: Walk the refill with the ball held.
Harder version: Let the passive defender choose cut or outside window.
Observe: The group refills in sequence without two players chasing one spot.
Close-range finishing drill
- Goal: Combine a controlled catch with a clear close shot.
- Readiness: Can receive and attempt the selected basic finish.
- Players: Passer, shooter and collector.
- Space: One active shot route and separate exit.
- Equipment: One ball and program-suitable basket.
- Editable example time: 4 minutes, rotate every job.
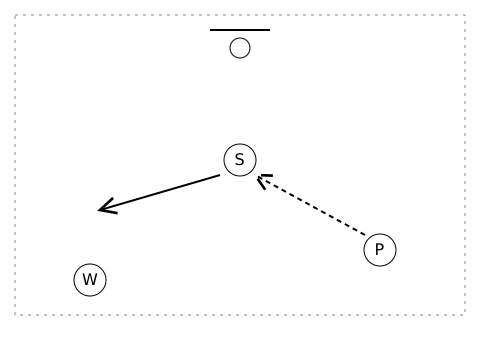
P feeds shooter S along the dashed line. W waits clear of the feed, landing and solid exit route. After S lands and leaves to the side, the collector returns the ball before the next turn.
Solid arrows show player movement; dashed arrows show the ball. The dotted edge marks an illustrative work area, not regulation boundaries.
Step 1: P feeds S at a close visible spot. S catches in balance and uses the chosen finish. The collector waits until S lands and leaves before returning the ball. Keep the waiting position away from the flight and rebound routes.
Step 2: Vary the feed side only after the first version stays calm. A poor feed is repeated, not chased under the rim. Use a reachable target or still close shot if the intended layup movement is not yet controlled.
Coach cue: Control the catch before the finish.
Easier version: Pause after receiving and take a still shot.
Harder version: Use a short walking approach with rule-checked footwork.
Observe: The feed supports a calm release and a clear landing.
Small-sided game
- Goal: Recognize a pass when the driving route closes.
- Readiness: Can see one teammate while handling the ball.
- Players: Two attackers and one controlled defender.
- Space: Half-court teaching area with clear boundaries.
- Equipment: One ball and a suitable target.
- Editable example time: 5 minutes, short turns with fixed rotation.
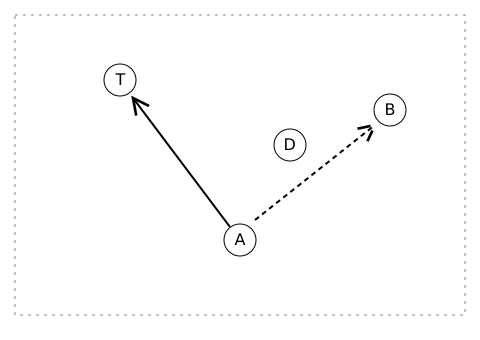
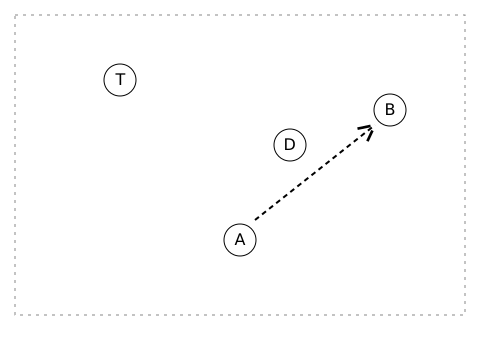
A can pass to B or move toward T. D shadows one option at walking pace, leaving A to read the other. The dashed line shows the pass and the solid arrow the move toward T; hold if neither choice is clear.
Solid arrows show player movement; dashed arrows show the ball. The dotted edge marks an illustrative work area, not regulation boundaries.
Step 1: Start A with a teammate B in a separate open angle. The defender closes either the route to the target or the direct pass at walking pace. A chooses the remaining option, or holds if neither is usable.
Step 2: End the first turns on the pass catch or controlled attempt. Rotate the first ball handler and defender regardless of the outcome. Only add permitted live pressure when the group understands how the two choices work.
Coach cue: Choose the window the defender leaves.
Easier version: Set the defender’s response before the start.
Harder version: Allow a slow choice by the defender after A receives.
Observe: A does not force the same action against both responses.
One-basket station rotation
- Goal: Keep the basket useful while others practice a related no-hoop task.
- Readiness: Understands the close finish and passing tasks separately.
- Players: Two small groups, each appropriately supervised.
- Space: Basket station plus a separate safe passing lane.
- Equipment: One active ball for each station.
- Editable example time: 6 minutes, stop and swap at midpoint.
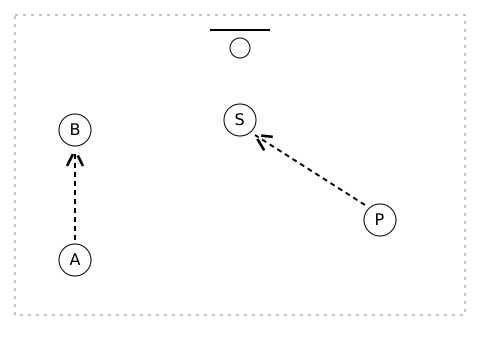
A and B pass in the left lane while P feeds S at the basket station on the right. The dashed lines keep the active ball routes separate. Stop both balls before exchanging groups by the outside route.
Solid arrows show player movement; dashed arrows show the ball. The dotted edge marks an illustrative work area, not regulation boundaries.
Step 1: One group uses a close catch-and-shot task. The other uses a still receive-and-turn pass, outside the rebound route. Set the same cue of control after the catch in both areas, so the second station has a reason to exist.
Step 2: Stop both balls before the groups exchange. Walk the chosen route with no passing during the move. If one adult cannot see both areas, keep one task active and use shorter fixed turns rather than leave a station unmanaged.
Coach cue: The swap begins with still balls.
Easier version: Use one shared passing triangle.
Harder version: Add a moving receiver in the no-hoop area after the route is familiar.
Observe: The station change stays clear and every group reaches the basket in turn.
Receive, turn and find a new window
- Goal: Keep a legal next choice after the dribble ends.
- Readiness: Can identify a planted foot in a still catch.
- Players: Three in a triangle with an adult cue.
- Space: Room around the receiver to turn without contact.
- Equipment: One ball.
- Editable example time: 4 minutes, reverse the passing direction.
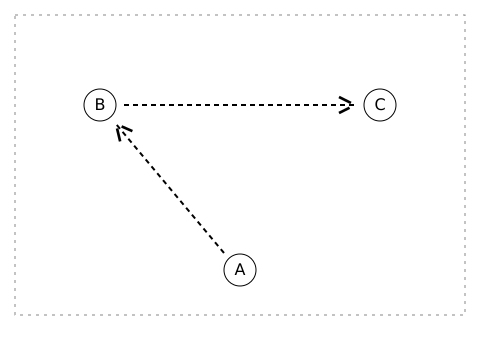
A sends to B, then B turns to see C and makes the second pass. The two dashed arrows show that order. B remains at the catch spot while turning under the program’s footwork rule.
Solid arrows show player movement; dashed arrows show the ball. The dotted edge marks an illustrative work area, not regulation boundaries.
Step 1: A passes to B, who catches and pauses. C offers a target outside B’s first view. B finds C with the legal turn the program is teaching, keeping the planted foot within the adopted rule.
Step 2: If the turn becomes a shuffle, remove the pass and establish the still position first. Later let C choose a nearby clear angle before the turn. Do not use an NBA moving-gather assumption as a universal youth rule.
Coach cue: See the next pass without losing the stop.
Easier version: Hold the ball and point to C before passing.
Harder version: Place a passive adult in one receiving line.
Observe: B keeps control while choosing a new view of the receiver.
Contain and offer an outlet
- Goal: Link legal ball protection to a useful pass.
- Readiness: Ready for a shadow defender under the local rules.
- Players: Dribbler, shadow and outside receiver.
- Space: Wide short lane with an outlet outside it.
- Equipment: One ball and optional lane markers.
- Editable example time: 4 minutes, one trip then rotate.
A handles the ball while D shadows with no reaching. B stays outside as an outlet; T marks the lane end. Use the dashed pass when B is visible, then end on the catch and rotate.
Solid arrows show player movement; dashed arrows show the ball. The dotted edge marks an illustrative work area, not regulation boundaries.
Step 1: A moves slowly while D shadows without reaching or contact. B stays visible outside the lane. A protects the ball by position, then passes when B’s target is open. The free arm must not push the defender away.
Step 2: End at B’s catch and rotate the roles. The defender can later close one side of the lane, leaving A time to choose an exit. Keep any stealing action within the program’s restrictions and outside the introductory shadow version.
Coach cue: Protect a next action, not just the ball.
Easier version: Remove D and use a known outlet spot.
Harder version: Let B choose between two nearby open angles.
Observe: A can see and use B instead of turning away until the route ends.
Put these activities into a practice
These are choices for a session, not a demand to use eight drills at once. An authored 30-minute skill block can use 3 minutes of readiness, 4 of dribble decisions, 4 of pass-and-move, 2 for water, 4 of finishing, 3 for a calm station reset and 10 of small-sided play with short rotations. That total includes transitions and can be shortened.
If the small game reveals a late pass, return to the moving receiver task next time rather than install a new offense. The no-hoop station should practice the same receiving decision as the basket station, so the swap is a useful continuation rather than a waiting pen. Keep group observations tied to the task and conditions, without child names or performance profiles.
FAQ
Does age ten mean every player is ready for pressure?
No. Observe the catch, stop and visible next option before adding a defender. A new player can use the same task without live pressure. Keep the local rules clear, and let a shadow defender create a simple choice first. A birthday is not evidence that a player can manage an unfamiliar route.
Should the coach use a full team game for every decision?
No. A two-attacker task can show a pass or drive choice with fewer moving parts. Explain its modified practice rules and rotate the jobs. A larger game is useful only when the adult can still observe the intended decision and the group has the space and readiness for it.
What should happen when a station gets crowded?
Stop it and change the route, group size or task. Do not add another active ball to a congested basket. Use a separate supervised no-hoop task where possible, or brief turns at one station. The chosen diagram does not certify that the actual floor has enough clear room.
How should the next drill be chosen?
Use the decision the group could not yet make under the stated conditions. If a receiver never stayed visible, use a target-angle task. If control disappeared during a turn, simplify the route. Keep the next demand specific, with no promised rate of improvement and no need for individual child records.
Choose the next coaching task
Youth Basketball Tips · https://youth-basketball-tips.com/youth-basketball-drills/basketball-drills-for-10-year-olds/